Farokasalmac

Factory reset sonos play 5 gen 2, how to factory reset sonos play 5 gen 1, factory reset sonos play 3, factory reset sonos playbar, factory reset sonos play 5 gen 1, factory reset sonos play 5 2nd gen reset, factory reset sonos beam, factory reset sonos move, factory reset sonos arc, factory reset sonos port, factory reset sonos play 1,

Are you having trouble with your Sonos speaker? Whether it's a One, Play 1, Play 5, or any other model, there are times when resetting it to its factory settings can be the perfect solution. Here are some easy steps on how to reset your Sonos speaker and have it working like new:

Resetting Sonos Speakers: A Step-by-Step Guide

The first thing you will need to do is to go to the Sonos app and select the speaker that needs resetting. Once you have selected it, click on the gear icon located at the upper right corner of the screen, and then click on "Settings."

Next, scroll down to the "System" section and click on "Reset System." You will then see two options: "Factory Reset" and "Reset All Settings."

Reset All Settings

If you choose to reset all settings, this will erase all customizations you have made to your Sonos player, such as saved playlists, volume settings, and EQ. However, it will not erase your music library or any sound-related files stored on your device. To proceed with this option, simply click on "Reset All Settings."

Factory Reset

If you want to completely erase everything on the device and start from scratch, then you'll want to choose the "Factory Reset" option. This will erase all data from your device, including your music library, and return it to its original settings. Click on "Factory Reset" to proceed.

Additional Tips for Resetting Sonos Speakers

If you find that factory resetting your Sonos speaker is not working, don't worry. There are other steps you can take to troubleshoot the problem. For example, you can try unplugging your device from the power source for a few minutes and then plugging it back in. This can sometimes reset the device and get it working again.

Another solution you can try is to update your device's software. This can sometimes solve any glitches or bugs that may be causing the problem. To check for updates, simply go to the Sonos app and click on "Settings," then select "System" and "System Updates."

Conclusion

Resetting your Sonos speaker may be a simple and effective solution to any issues you may experience with your device. We hope this step-by-step guide has been helpful to you. Whether you opt for a factory reset or a reset of all settings, just make sure you back up any important data before proceeding to avoid any data loss.

Remember, if you're still having trouble with your Sonos speaker, don't hesitate to contact the manufacturer's customer service or community for further assistance. Happy resetting!

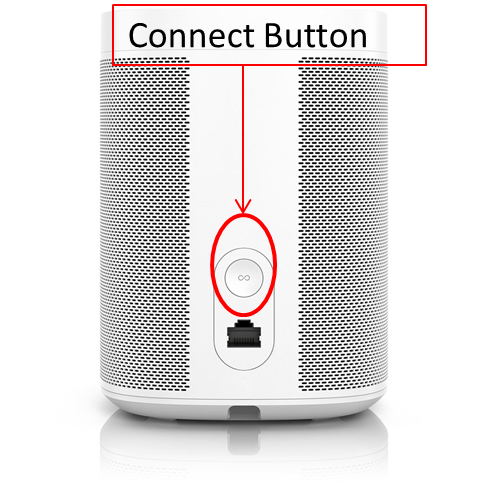
How to reset sonos speakers. How to reset a sonos speaker support.com. Sonos factory. How to hard factory reset sonos soundbar. Factory reset not working sonos community. Sonos reset. Sonos factory resetting component play reset button mute pause holding continue until

If you are looking for How to reset sonos speakers, you've visit to the right page. We have pictures like Reset sonos this is how it works with one, play 1, play 5 & co, how to factory reset your sonos player youtube, factory resetting a sonos component smart home sounds smart home sounds. Here it is:

How to reset / factory restore any sonos player youtube, how do i reset my sonos speaker? coolblue anything for a smile


Also read:

.

Maytag washer loud noise during rinse, maytag washer loud noise during spin cycle of washing machine, maytag washer loud noise during agitation, maytag washer loud when spinning, maytag washer loud noise during agitation, maytag washer loud buzzing, maytag washer loud grinding noise, maytag washer repair, maytag washer manual, maytag washer reviews,

Are you tired of the annoying noise your Maytag washer makes? If yes, then you're in the right place! We understand how frustrating it can be to hear your washer squeaking, screeching, or making any other loud noise every time you use it. That's why we have gathered some information on the common types of noise that Maytag washers make and how to fix them.

Maytag Washer Making Noise

If your Maytag washer is making a lot of noise while running, it could be due to several reasons. One of the most common reasons is a faulty tub bearing. The tub bearing is located at the center of the washer drum, and it can wear out over time due to the continuous load it carries. As a result, you may hear a loud noise during the spin cycle. Another possible reason could be a worn-out drive pulley or a damaged motor coupling.

Maytag Washer Making Loud Noise When Spinning?

If your Maytag washer is making a loud noise when spinning, it could be due to a worn-out tub seal or tub bearing. The tub seal is located at the bottom of the outer tub, and it prevents water from leaking out of the tub. If the seal is damaged or worn out, water can leak out, and the tub bearing may get damaged. A damaged tub bearing can cause a loud noise during the spin cycle, and it may need to be replaced. Another possible reason could be a worn-out drive belt or a faulty shock absorber.

Maytag Bravos Washer Noise Help

One of the most common issues that Maytag Bravos washers face is a loud noise during the spin cycle. If your washer is making a loud noise, it could be due to a faulty suspension rod or a worn-out bearing. The suspension rod is attached to the outer tub of the washer and is responsible for keeping it balanced during the spin cycle. If the suspension rod is damaged or worn out, the washer may produce a loud noise. Similarly, if the bearing is worn out or damaged, it can also cause a loud noise during the spin cycle.

Maytag Washer MAV5000AWW Making Screetching Noise at the End of Spin

If your Maytag MAV5000AWW washer is making a screetching noise at the end of the spin cycle, it could be due to a worn-out pulley or a faulty snubber ring. The pulley is responsible for driving the belt that turns the tub during the spin cycle. If the pulley is worn out or damaged, it can cause a screetching noise. A faulty snubber ring, which is located at the bottom of the washer drum, can also cause a screetching noise if it's damaged.

So, these are some of the common problems that may cause your Maytag washer to make noise. However, fixing these issues can be challenging, especially if you're not familiar with the technical aspects of the washer. Therefore, it's always recommended to seek professional help to solve these issues effectively. With the right tools and expertise, a professional appliance repair technician can quickly diagnose the issue and repair it correctly to restore your washer's functionality and peace of mind.

Now that you have an idea of some of the common problems that may cause your Maytag washer to make noise, you can take the necessary steps to fix them or seek professional help. Don't let annoying washer noise ruin your mood and peace of mind anymore – take action today!

Top 10 maytag washer making loud noise during spin cycle home studio. Maytag/whirlpool washer making loud grinding noise diagnosis and repair. Maytag noise. Maytag bravos washer noise help. Washer noise maytag spinning when loud making bearing makes defective tub. Whirlpool drain maytag spin kenmore washing duet playconsoler replaces discountwind esacni notxiro. How do i fix this noise..new maytag washer youtube

If you are searching about Maytag washer making loud noise during spin/wash cycle ready to diy, you've came to the right page. We have pics like Maytag bravos washer noise help, common maytag washer & dryer repairs sharper service solutions, maytag washer making loud noise when spinning? caesar's appliance. Here you go:

Maytag washer making loud noise during spin/wash cycle ready to diy, maytag centennial washer has loud noise during agitation youtube


Also read:

.

How to breed ghazt, how to breed a rare ghazt, how to breed ghazt msm, how to breed ghazt msm plant island, how to breed epic ghazt, how to breed shugabush, how to draw, how to take a screenshot, how to delete a page in word, how to print screen,

As a black person who is passionate about gaming, I know how important it is for players to have access to rare monsters in their collections. The thrill of catching them all and building up your team can be an exciting and rewarding experience. That's why I wanted to share my thoughts on the topic of breeding Ghazt monsters in the game.

Ghazt Breeding Promo

Recently, there has been a breeding promo in the game that has enticed many players to try and breed Ghazt monsters. These elusive monsters have been highly sought after by players for a long time, and the promo has given us a chance to try and collect them.

What Makes Ghazt Monsters Special?

Ghazt monsters are unique creatures that have a special set of abilities. They can sing, and their music can create a beautiful harmony that is pleasing to the ear. In the game, Ghazt monsters are known for their amazing singing voice that can attract other monsters to your collection.

Additionally, they can produce harmony in your island whenever they sing, which can lead to increased happiness among your monsters. This can lead to better rewards and better chances of breeding rare monsters.

Tips for Breeding Ghazt Monsters

If you are trying to breed Ghazt monsters, there are a few things to keep in mind. First, you need to have two monsters from different elements (Fire, Water, Earth, Plant, Electric, Air, Cold, and Ghazt) and two monsters that are at least level 4 in order to breed a Ghazt monster.

It's also important to note that breeding a Ghazt monster is not guaranteed, and it may take several tries to successfully breed one. The breeding process can take anywhere from 12 to 48 hours, depending on the monsters you are breeding.

One strategy that players have used to increase their chances of breeding a Ghazt monster is to use a triple-element monster that includes Air, Water, and Electric. This can increase the chances of a successful breeding and result in a Ghazt monster.

The Importance of Rare Monsters in the Game

Having rare monsters in your collection can be an amazing feeling. Not only do they add to the overall aesthetics of your island, but they can also help you in battles and produce more income for your island. Rare monsters can also attract other players to your island, which can lead to increased social interaction and a sense of community in the game.

Overall, the breeding promo for Ghazt monsters has been a great opportunity for players to try and collect these amazing creatures. While breeding a Ghazt monster may not be easy, the rewards of having one in your collection are undoubtedly worth it.

Final Thoughts

Ghazt monsters are truly unique creatures that are definitely worth the effort of trying to breed. With their amazing singing voice and ability to bring harmony to your island, they are a great addition to any collection. Whether you are a seasoned player or just starting out, I encourage you to try and breed a Ghazt monster and experience all of the amazing benefits that come with owning one.


Also read:

.

How to clear rocket league cache pc, wp rocket clear cache, how to clear cache, how to clear cache in edge, how to clear cache and cookies, how to clear cache on iphone, how to clear cache in edge browser, how to clear cache, how to clear search history, how to clear cache on microsoft edge, how to screenshot on windows 10, how to screenshot on pc,

In today's digital age, websites play a vital role in the success of businesses and organizations. As such, it is important to ensure that your website is always running smoothly and efficiently. One common issue that website owners face is the build-up of cache files, which can slow down the loading speed of your website.

The Importance of Clearing Cache

Before we dive into the steps for clearing cache in WordPress, it is important to understand the importance of doing so. Cache files are essentially temporary data that is stored on your computer or device to speed up the loading time of websites that you visit frequently. While this is beneficial for users, it can be a hindrance for website owners who want to ensure that their website is running at optimal speed.

Clearing cache files on your website can help to significantly reduce the loading time of your website, making it a more positive user experience for your visitors. Additionally, it can also help to improve your website's search engine optimization (SEO) by providing faster loading times for search engine crawlers.

Steps for Clearing Cache in WordPress

Now that we understand the importance of clearing cache files, let's take a look at the steps for doing so in WordPress.

  1. Using a caching plugin: One of the easiest ways to clear cache in WordPress is to use a caching plugin, such as WP Rocket. This plugin offers a quick and easy one-click option for clearing all cache files on your website.
  2. Manually clearing cache: If you do not want to use a plugin, you can also manually clear cache files in WordPress. This can be done by logging into your website's server using FTP or File Manager and deleting the cache files in the wp-content folder.
  3. Using a Content Delivery Network (CDN): Another option for clearing cache in WordPress is to use a CDN, such as Cloudflare. These services cache your website's content on their servers, which can help to improve website loading time and reduce the build-up of cache files on your website.

Conclusion

As you can see, clearing cache files in WordPress is an important step in ensuring that your website is running smoothly and efficiently. Whether you choose to use a caching plugin, manually delete cache files, or utilize a CDN, the end result will be a faster loading time for your website and a more positive user experience for your visitors. So don't neglect the importance of clearing cache - take the necessary steps today to optimize your website and improve its performance.

Remember, in today's competitive digital landscape, every little bit helps when it comes to improving website performance and user experience. So take the time to clear cache files on your website, and you will reap the benefits for years to come.


Also read:

.

How to screen record high quality iphone cable, how to screen record high quality videos mac, how to screen record on windows 11, how to screen record on computer, how to screen record on chromebook, how to screen record on hp laptop, how to screen record on lenovo laptop, how to take a screenshot,

Screen recording on your iPhone is a powerful feature that can be useful in many scenarios. From creating tutorials for YouTube to showing off your gaming skills to your friends, the ability to record your iPhone's screen is incredibly handy.

Getting Started with Screen Recording on your iPhone

In order to get started with screen recording on your iPhone, you need to first enable the feature. This can be done fairly easily by following the steps below:

  1. Open the Settings app.
  2. Tap on "Control Center".
  3. Select "Customize Controls".
  4. Scroll down and tap on the "+" next to "Screen Recording".

Once you have enabled screen recording, you can access the feature by swiping up from the bottom of your screen to open the Control Center. You should see a red circle with a white dot. This is the screen recording button.

Using Screen Recording on your iPhone

Now that you have enabled screen recording on your iPhone, it's time to start using it. Here's a step-by-step guide on how to use screen recording on your iPhone:

  1. Open the app or screen that you want to record.
  2. Swipe up from the bottom of your screen to open the Control Center.
  3. Tap on the screen recording button (the red circle with the white dot).
  4. Wait for the countdown to finish and then start recording.
  5. When you are done recording, tap on the red bar at the top of your screen to stop recording.

It's worth noting that when you start recording your iPhone's screen, you'll see a blue bar at the top of your screen. This indicates that your iPhone is currently recording. If you want to stop the recording, simply tap on the blue bar and then tap on "Stop".

Edit Your Screen Recording

Once you have finished recording, you may want to edit your screen recording before sharing it with friends or uploading it to YouTube. Fortunately, your iPhone has a built-in video editing tool that can be used to trim your recording or add basic effects. Here's how:

  1. Open the Photos app and find the recording you want to edit.
  2. Tap on "Edit".
  3. Use the yellow sliders on either end of the video timeline to trim the beginning or end of the video.
  4. If you want to add basic effects, tap on the three circles at the top right corner of the screen. This will give you access to a number of basic editing tools.
  5. When you are done editing, tap on "Done".

It's worth noting that the built-in editing tool on your iPhone is fairly basic. If you need more advanced editing features, you may need to use a third-party editing app on your computer.

Conclusion

Screen recording on your iPhone is a powerful and useful tool that can come in handy in many different situations. Whether you're creating tutorials, showing off your gaming skills, or just capturing a funny moment, screen recording on your iPhone is a great way to do it. Now that you know how to use this feature, you can start creating and sharing screen recordings with ease.

Tips and Tricks

Here are some tips and tricks that will help you get the most out of screen recording on your iPhone:

  • If you want to record audio as well as video, make sure to turn on your iPhone's microphone before you start recording.
  • When recording a game, use the "Do Not Disturb" feature to prevent notifications from interrupting your recording.
  • If you're using screen recording to create a tutorial, make sure to record your voice as well as the screen so that viewers can hear your instructions.

With these tips and tricks in mind, you'll be able to create high-quality screen recordings on your iPhone with ease.


Also read:

.

Search This Blog

Powered by Blogger.